Final Deliverable: Black Hole Raymarcher
Kenny Chen, Leonardo Tang, Lawrence ZhaoAbstract
We present an approach to render a realistic black hole in real time on the web using Three.js and GLSL. We use a fully shader-based approach and render a raymarched scene to simulate how light interacts with the black hole. We make approximations to physically-accurate equations in order to achieve maximum realism. In addition, we demonstrate that adding a postprocessing bloom filter makes our render more interesting and aesthetically pleasing.
Technical Approach
Gravitational Lensing
Gravitational lensing is an effect predicted by Albert Einstein’s general theory of relativity that describes how light is bent as it travels toward an observer. This effect is most noticeable for large masses, and is therefore very prominent in black holes.
We model this effect using the Einstein ring equation, which describes the deformation with respect to the mass of the lens, $M$, distance to the lense $D_L$, distance to the source $D_S$, and distance between the lens and source $D_{LS}$, $$\theta_1=\sqrt{\frac{4GM}{c^2}\frac{D_{LS}}{D_SD_L}}$$
where $G$ is the gravitational constant and $c$ is the speed of light. We modify this equation a bit to create the effects we desire.
In our shader program, we apply this deformation to the vector pointing from the center of the black hole to the current location being shaded and sample the texture at that location. To model the effect of light not being able to escape past the event horizon, we determine if the texture location being sampled is outside of the Schwarzchild radius. If it is inside this radius, we just set the color to black.
Below is a demo of our gravitational lensing shader from our milestone deliverable.
Raymarching
In the case of black holes, light does not travel in straight paths. The gravitational force of the black hole is so strong that it bends and curves the path of the light. The light might actually circle around the black hole multiple times. As a result, a traditional ray tracing algorithm is not feasible. Instead, a ray marching algorithm must be used. Ray marching works by having light take steps through a scene until it intersects an object, instead of implicitly calculating how far the ray will travel before it intersects an object, which is what is usually done in ray tracing. This is usually not efficient in traditional scenes when the light does travel in straight paths, as it is more efficient to go directly to the point of intersection instead of taking multiple steps to get there.
However, ray marching allows us to use Verlet integration (or any other physical simulation algorithm) to model the path of the light. Along the light’s path, we can then test for intersection with the accretion disk and the event horizon of the black hole. The event horizon is represented by a specific radius around the black hole’s center, so if the light ever comes within that distance of the black hole, it is sucked in and never returns. In this case, it just returns a black color. If the light intersects the accretion disk, we then sample from a corresponding location on our accretion disk texture, and return that color. We can test for intersection with the accretion disk by detecting if the light ever passes through the XZ plane, as the accretion disk lies in the XZ plane. If the light passes through the XZ within the radius of the accretion disk, but not within the radius of the event horizon, then it has intersected the accretion disk.
Ultimately, we can’t keep on simulating the light forever, but as long as we simulate enough of the light’s path, we’ll have a pretty good idea about whether it passes through the black hole’s event horizon or collides with the accretion disk. If neither of these cases happen, then it is extremely likely that the ray is simply shooting off into the oblivion of space. There may be a few rays still orbiting the black hole, but this is very unlikely. At the end of our simulation, if the light ray hasn’t intersected anything, we sample from a background texture based on the ray’s last known direction, similar to how environment lighting was done in Project 3-2.
Extra Physics
In order to add to the realism of our rendering, we made the viewing camera orbit around the black hole. We kept track of the camera's position relative to the black hole and modeled its physical behavior similar to how we modeled the path of light rays. You can notice how the background changes as time goes by, and that's because you're looking into a different point in space each time. As a result of the viewer's movement, we also attempted to implement some physical effects that would affect the appearance of the black hole in outer space. These include the Lorentz Transformation, the Dopper Effect, and Relativistic Beaming. The details can be found in the given links, and ultimately, these features don't appear to make a significant difference in the final result, but we thought they were worth a mention.
Post Processing
To make the overall visual more appealing and closer to the interstellar rendition, we added a bloom filter to the image produced by our render. To do so, we took advantage of the Effect Composer in Three.js, which lets us set up a simple post processing pipeline. First we use a render pass to render the scene to a render target, and then we use a bloom pass to add the bloom filter to the image, which we then render to the screen. We chose to use the Unreal Bloom Pass filter, with parameters {exposure = 2, threshold = 0.5, strength = 0.25, and radius = 0.25}.
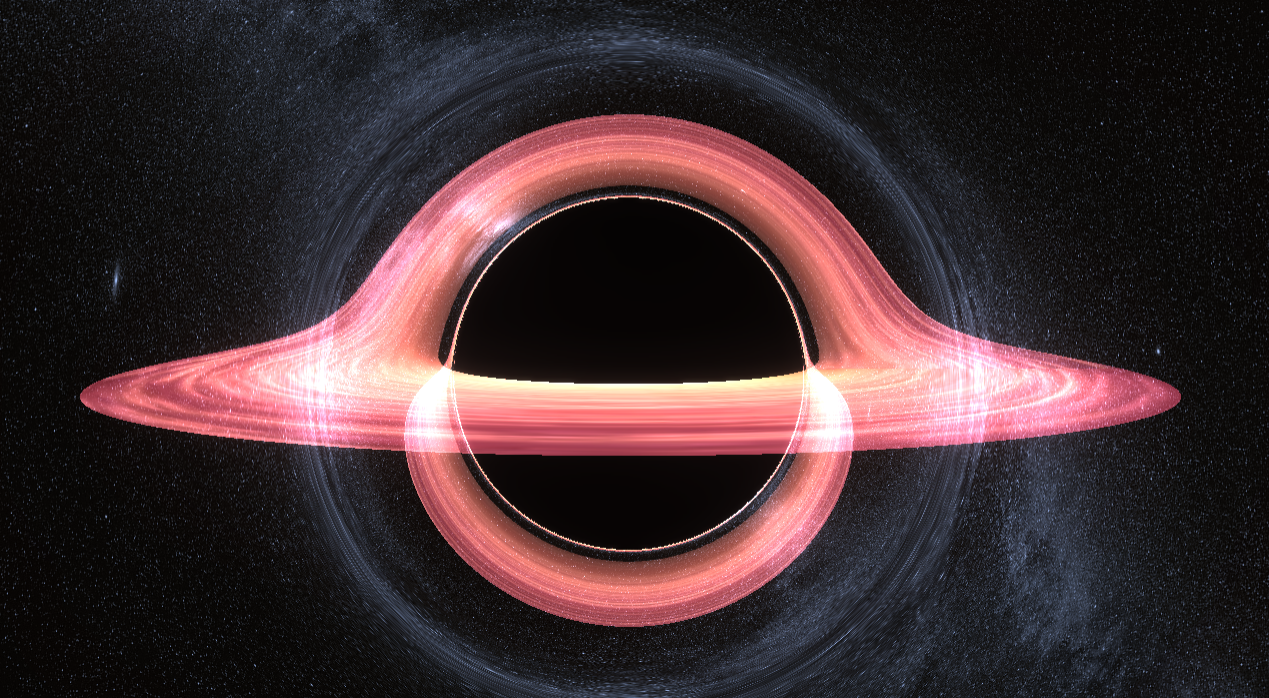
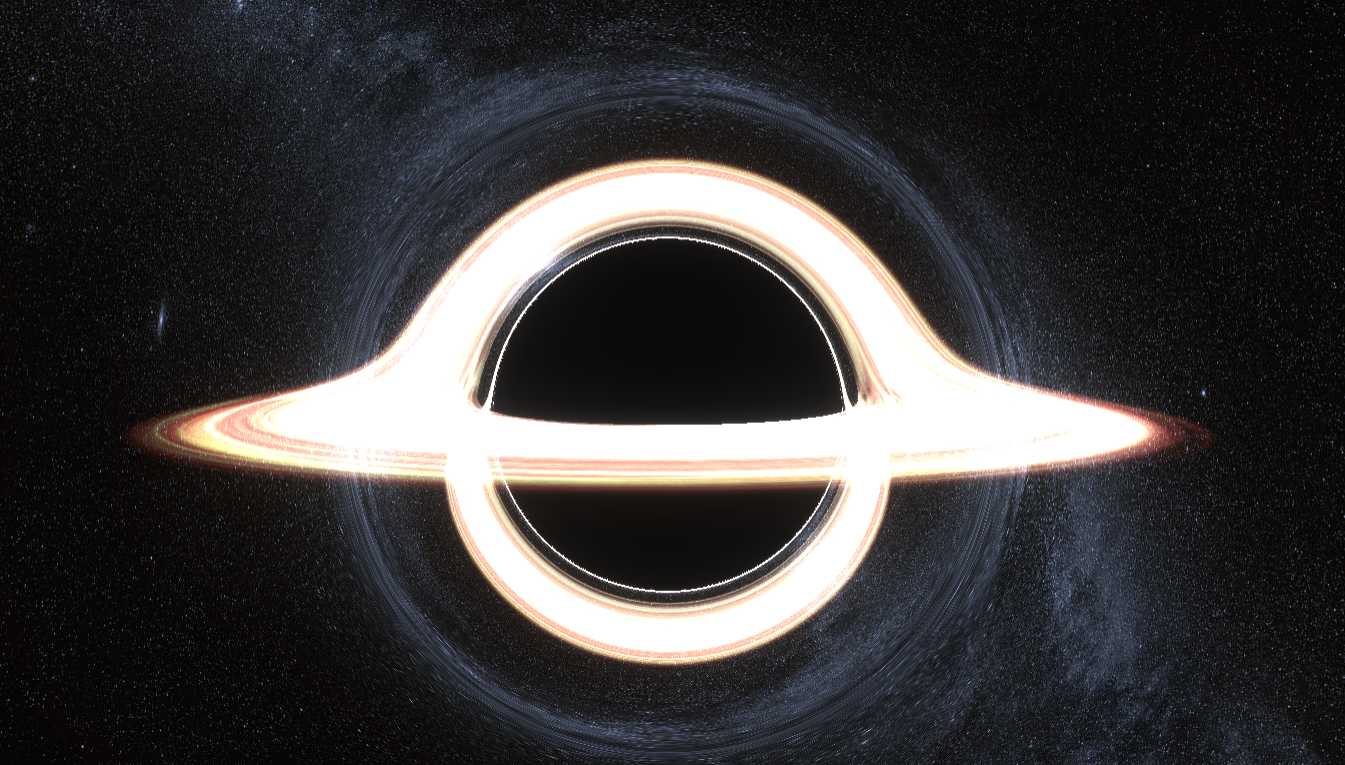
Below we have examples of the rendered model before and after we applied the bloom filter. As you can see, before the bloom filter was utilized, the accretion disk looks rather thin and is dominated by a red color. After the bloom filter, the accretion disk takes on a much brighter, blinding white color. This is desirable since we were aiming for a picture closer to the black hole render in Interstellar, requiring a brighter, harsher light that seems a bit more magical than a mundane red ring.
Results
You can access the full screen version of our black hole renderer below. Take note of how the accretion disk orbits around the black hole, how the background moves as the viewing camera orbits around the black hole, and how the black hole distorts the section of the background image behind it. WARNING: rendering a black hole through raymarching requires a significant amount of computational power, so opening the link may slow down your computer.
For those of you who may not have a computer powerful enough to fully appreciate the final product, you can watch the video below to see a short demo.
Video
Slides
References
Examples of black hole shaders we were given in our proposal feedback
Raymarching resources
- - Medium article with nice overview
- - More detailed article implemented in Unity
- - Work of Riccardo Antonelli, a PhD student Scuola Normale Superiore in Italy (mentioned in Proposal)
Wikipedia articles
THREE.js Post Processing Documentation
Contributions of Each Team Member
Kenny Chen
- - Set up initial Three.js scene and GLSL files
- - Wrote fragment shader for modeling gravitational lensing
- - Helped write javascript functions that repeatedly run raymarching algorithm
Leonardo Tang
- - Wrote camera movement javascript file
- - Helped write javascript functions that repeatedly run raymarching algorithm
- - Added post-processing
Lawrence Zhao
- - Wrote raymarching algorithm in vertex shader
- - Implemented extra physical light effects